Let’s continue the modern vanilla JavaScript series!
Article Series
I’ll discuss best practices to avoid excess memory usage when managing updating the DOM to make your apps blazingly fast™️.
DOM: Document Object Model – A Brief Overview
When you render HTML, the live view of those rendered elements in the browser is called the DOM. This is what you’ll see in your developer tools “Elements” inspector:

It’s essentially a tree, with each element inside of it being a leaf. There is an entire set of APIs specifically dealing with modifying this tree of elements.
Here’s a quick list of common DOM APIs:
querySelector()querySelectorAll()createElement()getAttribute()setAttribute()addEventListener()appendChild()
These are attached to the document, so you use them like const el = document.querySelector("#el");. They are also available on all other elements, so if you have an element reference you can use these methods and their abilities are scoped to that element.
const nav = document.querySelector("#site-nav");
const navLinks = nav.querySelectorAll("a");Code language: JavaScript (javascript)
These methods will be available in the browser to modify the DOM, but they won’t be available in server JavaScript (like Node.js) unless you use a DOM emulator like js-dom.
As an industry, we’ve offloaded most of this direct rendering to frameworks. All JavaScript frameworks (React, Angular, Vue, Svelte, etc) use these APIs under the hood. While I recognize that the productivity benefits of frameworks often outweigh the potential performance gains of manual DOM manipulation, I want to demystify what goes on under the hood in this article.
Why manipulate the DOM yourself in the first place?
The main reason is performance. Frameworks can add unnecessary data structures and re-renders leading to the dreaded stuttering / freezing behavior seen in many modern web apps. This is due to the Garbage Collector being put on overdrive having to handle all that code.
The downside is it is more code to handle DOM manipulation yourself. It can get complicated, which is why it a better developer experience to use frameworks and abstractions around the DOM rather than manipulating the DOM manually. Regardless, there are cases where you may need the extra performance. That is what this guide is for.
VS Code is Built on Manual DOM Manipulation
Visual Studio Code is one of those such cases. VS Code is written in vanilla JavaScript “to be as close to the DOM as possible.” Projects as large as VS Code need to have tight control over performance. Since much of the power is in the plugins ecosystem, the core needs to be as core and lightweight as possible and is responsible for its wide adoption.
Microsoft Edge also recently moved off of React for the same reason.
If you find yourself in this case where you need the performance of direct DOM manipulation – lower level programming than using a framework – hopefully this article will help!
Tips for More Efficient DOM Manipulation
Prefer hiding/showing over creating new elements
Keeping your DOM unchanged by hiding and showing elements instead of destroying and creating them with JavaScript is always going to be the more performant option.
Server render your element and hide/show it with a class (and appropriate CSS ruleset) like el.classList.add('show') or el.style.display = 'block' instead of creating and inserting the element dynamically with JavaScript. The mostly static DOM is much more performant due to the lack of garbage collection calls and complex client logic.
Don’t create DOM nodes on the client dynamically if you can avoid it.
But do remember assistive technology. If you want an element both visually hidden and hidden to assistive technology, display: none; should do it. But if you want to hide an element and keep it there for assistive technology, look at other methods for hiding content.
Prefer textContent over innerText for reading the content of an element
The innerText method is cool because it is aware of the current styles of an element. It knows if an element is hidden or not, and only gets text if something is actually displaying. The issue with it is that this process of checking styles forces reflow, and is slower.
Reading content with element.textContent is much faster than element.innerText, so prefer textContent for reading content of an element where possible.
Use insertAdjacentHTML over innerHTML
The insertAdjacentHTML method is much faster than innerHTML because it doesn’t have to destroy the DOM first before inserting. The method is flexible in where it places the new HTML, for example:
el.insertAdjacentHTML("afterbegin", html);
el.insertAdjacentHTML("beforeend", html);Code language: JavaScript (javascript)
The Fastest Approach is to use insertAdjacentElement or appendChild
Approach #1: Use the template tag to create HTML templates and appendChild to insert new HTML
These are the fastest methods are to append fully formed DOM elements. An established pattern for this is to create an HTML template with the <template> tag to create the elements, then insert them into the DOM with insertAdjacentElement or appendChild methods.
<template id="card_template">
  <article class="card">
    <h3></h3>
    <div class="card__body">
      <div class='card__body__image'></div>
      <section class='card__body__content'>
      </section>
    </div>
  </article>
</template>Code language: HTML, XML (xml)
function createCardElement(title, body) {
const template = document.getElementById('card_template');
const element = template.content.cloneNode(true).firstElementChild;
const [cardTitle] = element.getElementsByTagName("h3");
const [cardBody] = element.getElementsByTagName("section");
[cardTitle.textContent, cardBody.textContent] = [title, body];
return element;
}
container.appendChild(createCardElement(
"Frontend System Design: Fundamentals",
"This is a random content"
))Code language: JavaScript (javascript)You can see this in action in the new, Front-End System Design course, where Evgenni builds an infinite scrolling social news feed from scratch!
Approach #2: Use createDocumentFragment with appendChild to Batch Inserts
DocumentFragment is a lightweight, “empty” document object that can hold DOM nodes. It’s not part of the active DOM tree, making it ideal for preparing multiple elements for insertion.
const fragment = document.createDocumentFragment();
for (let i = 0; i < 1000; i++) {
  const li = document.createElement('li');
  li.textContent = `Item ${i}`;
  fragment.appendChild(li);
}
document.getElementById('myList').appendChild(fragment);Code language: JavaScript (javascript)
This approach minimizes reflows and repaints by inserting all elements at once, rather than individually.
Manage References When Nodes are Removed
When you remove a DOM node, you don’t want references sitting around that prevent the garbage collector from cleaning up associated data. We can use WeakMap and WeakRef to avoid leaky references.
Associate data to DOM nodes with WeakMap
You can associate data to DOM nodes using WeakMap. That way if the DOM node is removed later, the reference to the data will be gone for good.
let DOMdata = { 'logo': 'Frontend Masters' };
let DOMmap = new WeakMap();
let el = document.querySelector(".FmLogo");
DOMmap.set(el, DOMdata);
console.log(DOMmap.get(el)); // { 'logo': 'Frontend Masters' }
el.remove(); // DOMdata is able to be garbage collectedCode language: JavaScript (javascript)
Using weak maps ensures references to data doesn’t stick around if a DOM element is removed.
Clean up after Garbage Collection using WeakRef
In the following example, we are creating a WeakRef to a DOM node:
class Counter {
  constructor(element) {
    // Remember a weak reference to the DOM element
    this.ref = new WeakRef(element);
    this.start();
  }

  start() {
    if (this.timer) {
      return;
    }

    this.count = 0;

    const tick = () => {
      // get the element from the weak reference, if it still exists
      const element = this.ref.deref();
      if (element) {
        console.log("Element is still in memory, updating count.")
        element.textContent = `Counter: ${++this.count}`;
      } else {
        // The element doesn't exist anymore
        console.log("Garabage Collector ran and element is GONE – clean up interval");
        this.stop();
        this.ref = null;
      }
    };

    tick();
    this.timer = setInterval(tick, 1000);
  }

  stop() {
    if (this.timer) {
      clearInterval(this.timer);
      this.timer = 0;
    }
  }
}

const counter = new Counter(document.getElementById("counter"));
setTimeout(() => {
  document.getElementById("counter").remove();
}, 5000);Code language: JavaScript (javascript)
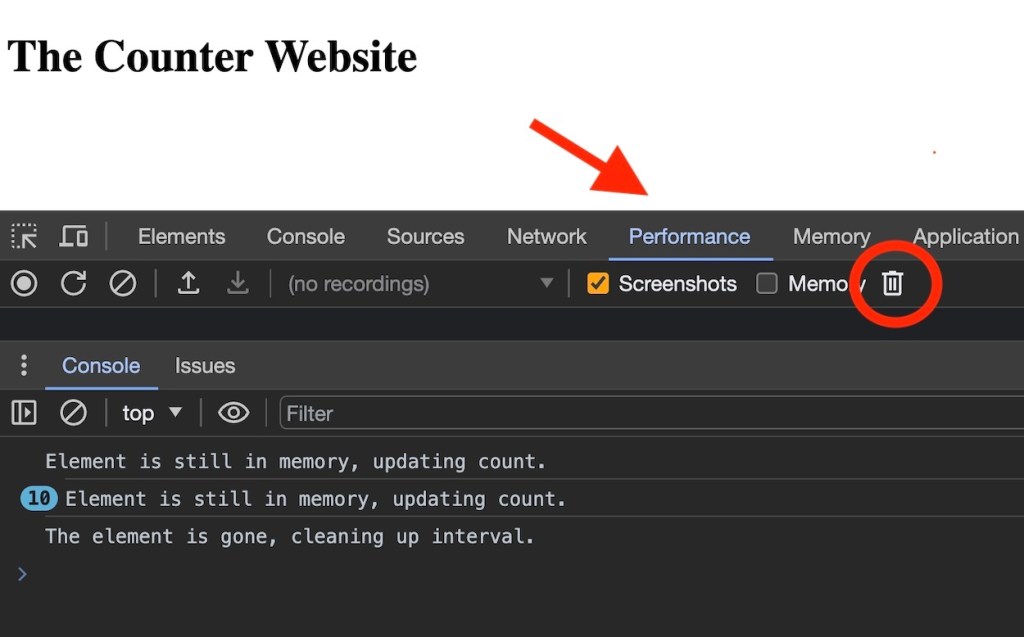
After removing the node, you can watch your console to see when the actual garbage collection happens, or you can force it to happen yourself using the Performance tab in your developer tools:

Then you can be sure all references are gone and timers are cleaned up.
Note: Try not to overuse WeakRef—this magic does come at a cost. It’s better for performance if you can explicitly manage references.
Cleaning up Event Listeners
Manually remove events with removeEventListener
function handleClick() {
  console.log("Button was clicked!");
  el.removeEventListener("click", handleClick);
}

// Add an event listener to the button
const el = document.querySelector("#button");
el.addEventListener("click", handleClick);Code language: JavaScript (javascript)
Use the once param for one and done events
This same behavior as above could be achieved with the “once” param:
el.addEventListener('click', handleClick, {
  once: true
});Code language: JavaScript (javascript)
Adding a third parameter to addEventListener with a boolean value indicating that the listener should be invoked at most once after being added. The listener is automatically removed when invoked.
Use event delegation to bind fewer events
If you are building up and replacing nodes frequently in a highly dynamic component, it’s more expensive to have to setup all their respective event listeners as you’re building the nodes.
Instead, you can bind an event closer to the root level. Since events bubble up the DOM, you can check the event.target (original target of the event) to catch and respond to the event.
Using matches(selector) only matches the current element, so it needs to be the leaf node.
const rootEl = document.querySelector("#root");
// Listen for clicks on the entire window
rootEl.addEventListener('click', function (event) {
  // if the element is clicked has class "target-element"
  if (event.target.matches('.target-element')) doSomething();
});Code language: JavaScript (javascript)
More than likely, you’ll have elements like <div class="target-element"><p>...</p></div> in this case you’d need to use the .closest(element) method.
const rootEl = document.querySelector("#root");
// Listen for clicks on the entire window
rootEl.addEventListener('click', function (event) {
  // if the element is clicked has a parent with "target-element"
  if (event.target.closest('.target-element')) doSomething();
});Code language: JavaScript (javascript)
This method allows you to not worry about attaching and removing listeners after dynamically injecting elements.
Use AbortController to unbind groups of events
const button = document.getElementById('button');
const controller = new AbortController();
const { signal } = controller;

button.addEventListener(
  'click',
  () => console.log('clicked!'),
  { signal }
);

// Remove the listener!
controller.abort();Code language: JavaScript (javascript)
You can use the AbortController to remove sets of events.
let controller = new AbortController();
const { signal } = controller;

button.addEventListener('click', () => console.log('clicked!'), { signal });
window.addEventListener('resize', () => console.log('resized!'), { signal });
document.addEventListener('keyup', () => console.log('pressed!'), { signal });

// Remove all listeners at once:
controller.abort();Code language: JavaScript (javascript)
Shout out to Alex MacArthur for the AbortController code example on this one.
Profiling & Debugging
Measure your DOM to make sure it is not too large.
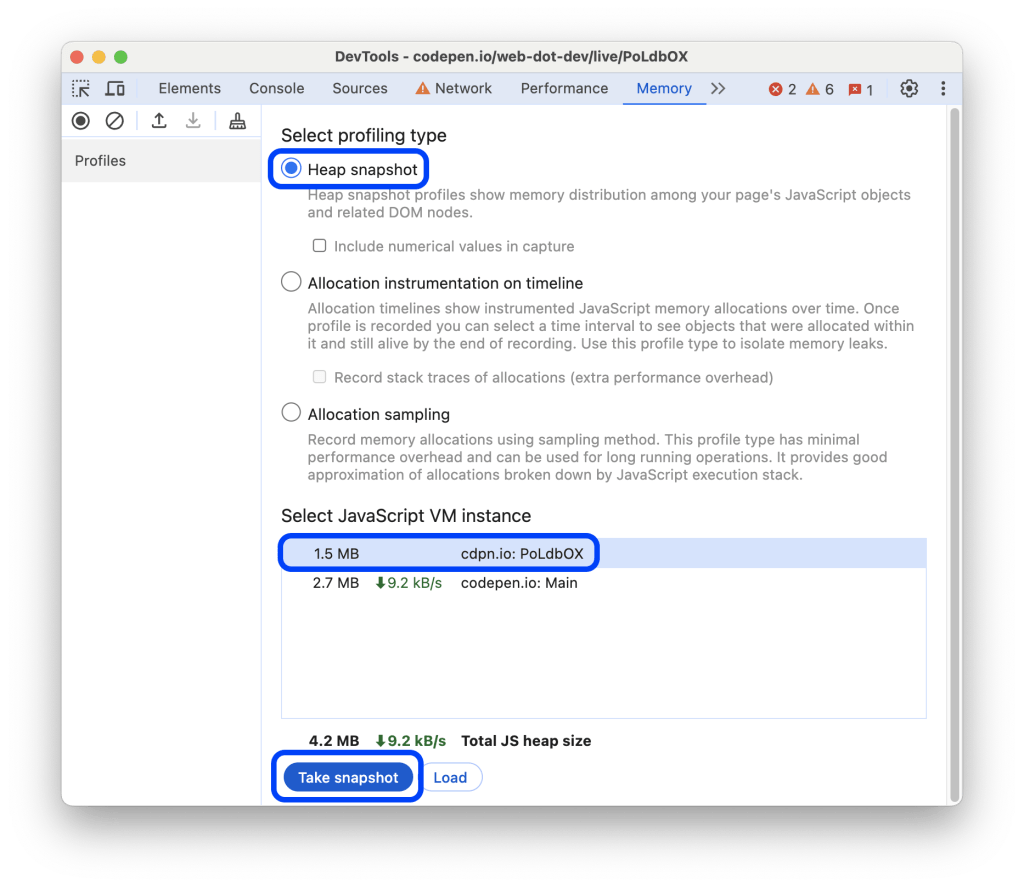
Here’s a brief guide on using Chrome DevTools for memory profiling:
- Open Chrome DevTools
- Go to the “Memory” tab
- Choose “Heap snapshot” and click “Take snapshot”
- Perform your DOM operations
- Take another snapshot
- Compare snapshots to identify memory growth

Key things to look for:
- Unexpectedly retained DOM elements
- Large arrays or objects that aren’t being cleaned up
- Increasing memory usage over time (potential memory leak)
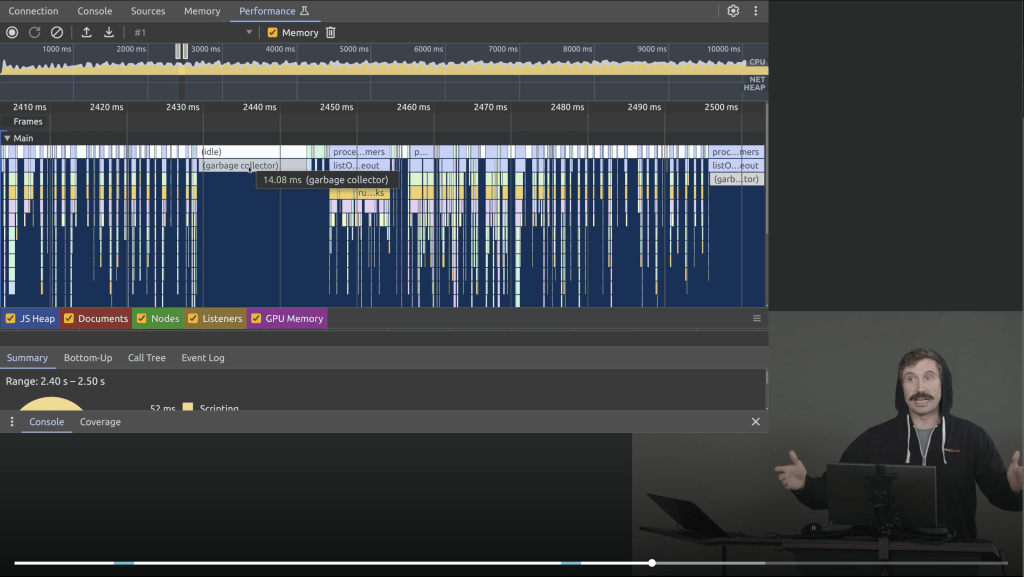
You can also use the “Performance” tab to record memory usage over time:
- Go to the “Performance” tab
- Check “Memory” in the options
- Click “Record”
- Perform your DOM operations
- Stop recording and analyze the memory graph
This will help you visualize memory allocation and identify potential leaks or unnecessary allocations during DOM manipulation.
JavaScript Execution Time Analysis
In addition to memory profiling, the Performance tab in Chrome DevTools is invaluable for analyzing JavaScript execution time, which is crucial when optimizing DOM manipulation code.
Here’s how to use it:
- Open Chrome DevTools and go to the “Performance” tab
- Click the record button
- Perform the DOM operations you want to analyze
- Stop the recording

The resulting timeline will show you:
- JavaScript execution (yellow)
- Rendering activities (purple)
- Painting (green)
Look for:
- Long yellow bars, indicating time-consuming JavaScript operations
- Frequent short yellow bars, which might indicate excessive DOM manipulation
To dive deeper:
- Click on a yellow bar to see the specific function call and its execution time
- Look at the “Bottom-Up” and “Call Tree” tabs to identify which functions are taking the most time
This analysis can help you pinpoint exactly where your DOM manipulation code might be causing performance issues, allowing for targeted optimizations.
Performance Debugging Resources
Articles by the Chrome dev team:
Courses that cover the memory and performance analysis and Chrome Dev Tools further:
- Blazingly Fast JS by ThePrimeagen
- Web App Performance by Maximiliano Firtman
- React Performance by Steve Kinney
- Chrome Dev Tools by Jon Kuperman
- Bare Metal JavaScript: The JavaScript Virtual Machine by Miško Hevery
Remember, efficient DOM manipulation isn’t just about using the right methods—it’s also about understanding when and how often you’re interacting with the DOM. Excessive manipulation, even with efficient methods, can still lead to performance issues.
Key Takeaways for DOM Optimization
Efficient DOM manipulation knowledge is important when creating performance-sensitive web apps. While modern frameworks offer convenience and abstraction, understanding and applying these low-level techniques can significantly boost your app’s performance, especially in demanding scenarios.
Here’s a recap:
- Prefer modifying existing elements over creating new ones when possible.
- Use efficient methods like
textContent,insertAdjacentHTML, andappendChild. - Manage references carefully, leveraging
WeakMapandWeakRefto avoid memory leaks. - Clean up event listeners properly to prevent unnecessary overhead.
- Consider techniques like event delegation for more efficient event handling.
- Use tools like
AbortControllerfor easier management of multiple event listeners. - Employ
DocumentFragments for batch insertions and understand concepts like the virtual DOM for broader optimization strategies.
Remember, the goal isn’t always to forgo frameworks and manually manipulate the DOM for every project. Rather, it’s to understand these principles so you can make informed decisions about when to use frameworks and when to optimize at a lower level. Tools like memory profiling and performance benchmarking can guide these decisions.

Thanks so much for these rare gems. I’ve been doing JavaScript for a while and didn’t know about these. Will definitely use these tips in the future
Insightful read!
I learnt a lot from it
Thank you Marc 🙂
You’re welcome!
Learnt a lot of new stuffs today. The use of DocumentFragment and AbortController are the best.
Amazing!!!
We want more on this series.